


Our last tutorial had us extending the main and balcony entrances to our flag room. At this point, we're ready to begin moving into the midfield. Midfield is a whole different animal from what we've been doing previously. Though the mechanics of building it remain the same, of course, midfield will be considerably larger than anything else we've built so far. As such, there are several things to keep in mind while building your mid.
First and foremost, playability. There are too many maps in which midfield too easily becomes a big deathmatch fest. WFA is not deathmatch. It is CTF. Having gunners, snipers, arsos, etc all in mid intercepting the offense of the other team makes for a rather boring game for both sides. Though people like to blame the mod for this, it's not the mod that's the problem. It's not really even the players that are at fault. It's the map. With a properly designed midfield, a game-killing deathmatch brawl in mid isn't possible. The ideal is to enable passing offenses to take shot or two at each other in passing, but prevent anyone from creating a blockade in mid.
Secondly, midfield is large, and there's always going to be alot of action there. As such, the complexity of the scene increases, causing potential slowdowns in framerate. Keeping this in mind, you should build your midfield to minimize framerate loss. Avoid complex textures/shaders, avoid an overabundance of detail. In a few more tutorials, we'll go in-depth on how to performance-tune your map. At this point, just keep it in the back of your mind.
Excellent. With that out of the way, let's begin. While floating around the outside of our map, I noticed some issues with the courtyard we made as part of the last tutorial. Namely, we had some overlapping brushes, and we also had sides textured that shouldn't have been. I fixed this with some retexturing and deleting of excess brushes.
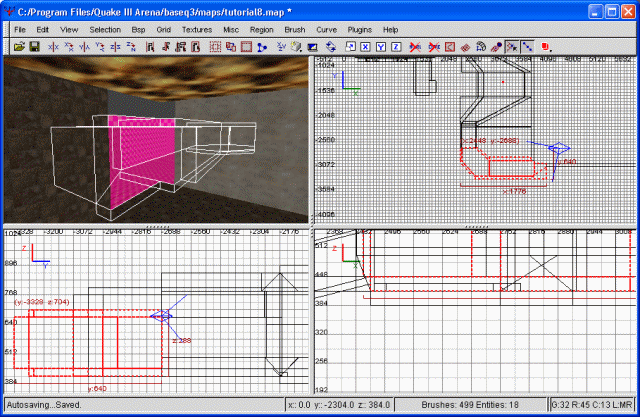
With that done, I'm going to start with the main entranceway. This is the 'northern' passage we glued shut with some caulk. I'm deleting our caulk brush, then redirecting our passage to aim 'southward'. Rather than put a 90 degree turn in the passage, I've opted to put in more of an 'elbow'. Ordinarily this is a great way to keep a gunner from lasering the entrance, but the size of this thing is such that wouldn't really be an issue in any case. Allow me to supply you with a screenshot.
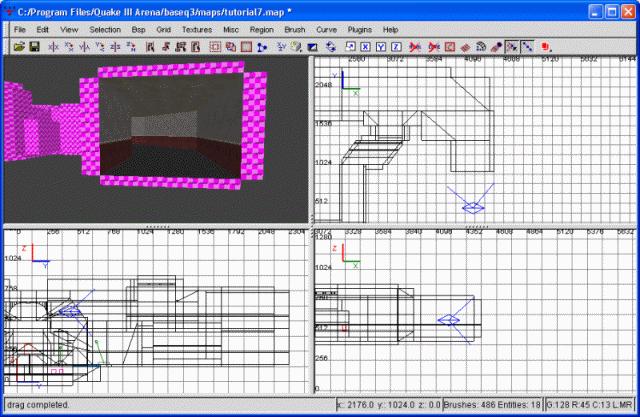
Extending the main entrance
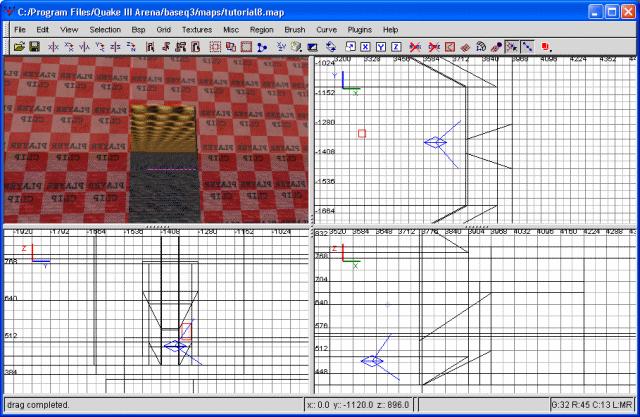
Great. We're now ready to start building the midfield. The opening we have right now will be the opening into mid. Now it's time to start laying down the basic structure of mid. I've decided to outline my entire midfield as a big square, cutting out the mid and thus allowing me the ability to compile the map whenever I want to check out something. It will also give me an abbreviated idea of just how big midfield is going to end up. I did compile it immediately afterware to check out the overall size, and wasn't too pleased. Due to how far apart our main entrance is from where our secondary entrances will be, midfield has to be quite wide. Too wide, in my opinion.
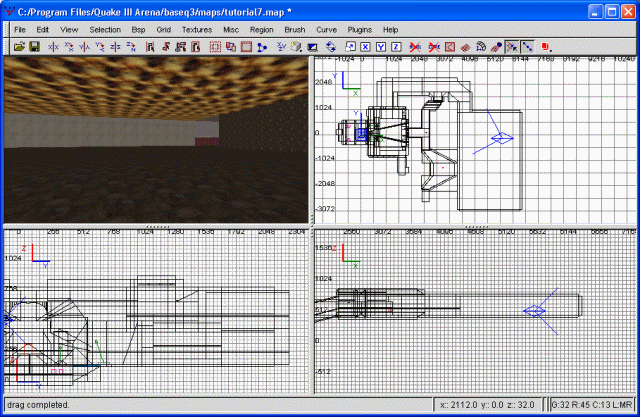
The aborted midfield
I'm going to extend the hallway for our main entranceway. This is the best way I can think of to shrink the midfield width. Having extended the hallway, I'm much happier with the width of mid. Another screenshot to illustrate the new midfield.
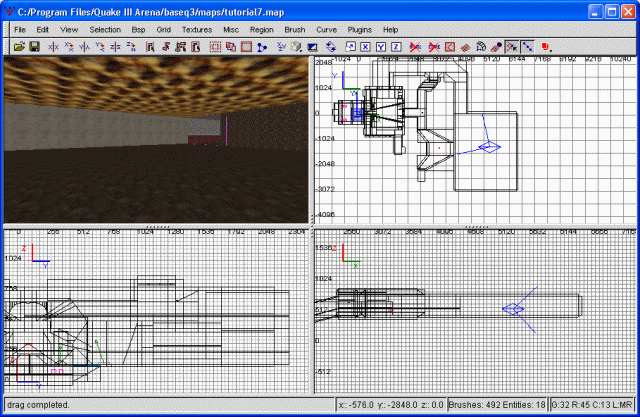
The improved midfield
Excellent. Let's go ahead and join the rest of our entrances to the mid. If you hadn't quessed, our courtyard is going to have another passageway coming from it, and meeting up with midfield on the opposite side from our Main entrance. Let's go ahead and do that, shall we?
I'll start by removing the brush I used to clog the entrance. Then I'm extending the hallway outward by adding a ceiling and walls. In order to avoid possible problems with aligning brushes, I clipped out part of the wall (east side) that bordered on the passage and just put in a simple wall brush. Some not-so-simple clipping followed that, though this is nothing we haven't done before. I then textured the floor of the passage gothic_block/gkc10, the walls gothic_block/smblk3b3dim_wall, and the ceiling gothic_ceiling/ceilingtechplain. This is all subject to change, of course, since we're just making a quick passageway to help define midfield.
The courtyard-midfield entrance
Next I'm going to curve it around 90 degrees and merge it with midfield. I'm almost certainly going to change the way this looks eventually, but once more, it's just helping to define our midfield. I started with just the walls this time, drawing out a slightly meandering path to midfield. Rather than any right angles, I decided to put some more 'curve' into the passageways. After tracing out the basic walls, I then filled in the ceiling and floor of the passageways. Finally, I moved aside the midfield walls to allow access. I'm going to supply a screenshot of the (almost) finished hallway. All that remains to be done is texturing and filling in a hole at midfield (shown in the pic).
Bring the entrance into Mid
After filling in the hole and texturing it, I'll need one last thing: light. Since we're planning on remodeling the whole thing anyway, I'm just going to throw in a couple entity lights. In fact, put two in, with light values of 800. Boom, we now have a navigable passage.
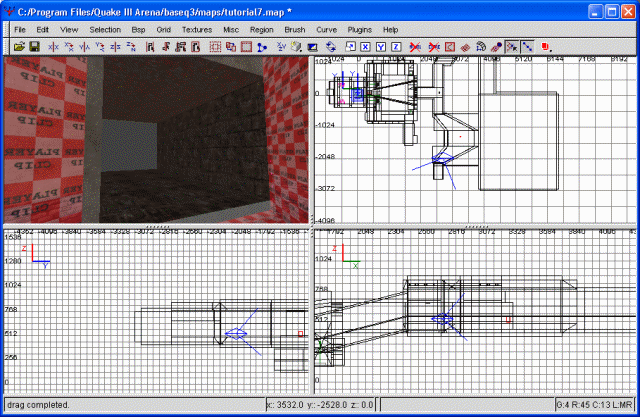
Ok, that's out of the way. You've probably noticed how my courtyard expands toward the midfield... this is on purpose. What we're doing next is putting a sniper balcony extending off of it, into the mid. Sound fun? Absolutely. To begin this exercise, we're highlighting the wall closest to the mid. That includes the clip wall, the lower, slanted wall, and the wall proper. I'm also highlighting the actual midfield wall. Once that's done, I'm clipping the lot diagonally from the top view. This will define the passage to the sniper roost. I'm going to make it more-or-less centered on the wall.
Next I'm deselecting everything but the centermost brushes (four of them). These I'm clipping at an angle from the side view in order to define the slope of the passage. Finally, I'm clipping again (from the side view) at a higher elevation to define the top of the sniper balcony passageway. Another screenshot to more accurately explain what I'm doing.
The sniper balcony passageway
At this point, we don't have much of a balcony. In fact, the passageway terminates so close to the ground at mid it's virtually useless. Which is why we're going to extend the whole thing into the midfield. In case you didn't notice, I already started texturing stuff. You can clip and texture as we go, or just do it all at the end. Your choice.
So, to extend the balcony, first I'm going to finish the hallway. We already have the slope defined, so I just drew out a large brush into midfield. I extended this to about the distance I expect the balcony to extend (and, incidentally, where the floor of the balcony will be). Don't worry about making it too big... you can always clip it off later. With that drawn out, I then clipped it at the same angle as the rest of the passage. Following that, I clipped the edges (from the top view) to match up with the angle we had from the earlier passage. Really not too hard, honestly. Everything's already been defined insofar as angles. The rest is just mechanical.
You may have noticed our sky is getting a little cramped. To alleviate this, I've raised the sky, then matched all our midfield walls to it. The main passage, since it was flush with the sky to begin with, had to have new brushes drawn to fill in open holes, but this should be fairly easy to do by now.