Ok, that was a pretty rough explanation, but hopefully you get the idea. Well, you say, now that we have a room, can we play around in it? Nope, not yet. We're missing several important peices to a map.
First, let's get into the viewer window in the top left of the screen. This will allow you to see a (rough) approximation of what your level will look like. Right-click in this screen, and then move your mouse around. You can see that you're able to look all around yourself in every direction. Hit the arrow keys on your keyboard to move forward, back and sidways. This is how you navigate your map. This becomes exceedingly important as your map gains size and complexity. One last set of controls are the 'd' and 'c' keys on your keyboard. These move the camera vertically. Please play around in this awhile before continueing. The next part will assume that you can use this viewfinder.
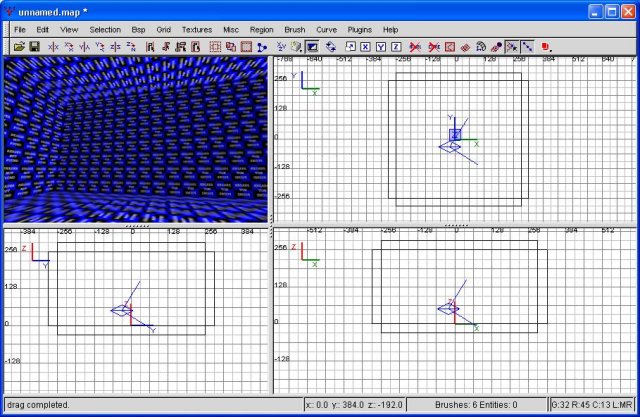
The ViewFinder
Excellent, now that we've mastered that, let's move on to the first of two things we need to do before we can compile our first map. What we'll be covering FIRST is textures. Notice how all our brushes are covered in blue and black? That's because we have no texture selected. Let's go ahead and select a texture.
Click on textures, and then common. Your computer will pause for a moment while GTKRadiant loads all the common textures into memory. Nothing happen? Right, nothing's supposed to happen (besides the temporary pause).
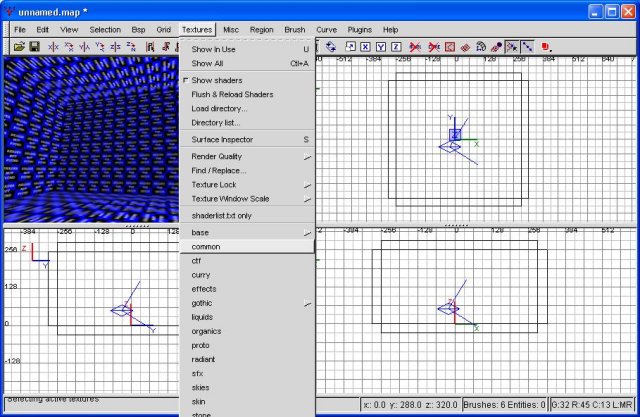
Select the following textures
With that finished, hit the letter 't' on your keyboard. This will bring up the texture menu. Nice? Sure it is. Hit escape. We're not ready for that quite yet.
Alright, what we're going to do is texture all our brushes with the CAULK texture. Why? Because caulk should be the basic building block from which you build everything. Allow me to launch on another tangent.
Textures, of course, are what allow you to make things in maps look good. Walls look like walls, floors look like floors, brick looks like brick, etc etc. Textures are the basis for all (or at least most) eye candy. Textures are, also, the basis for a great deal of why quake runs slow on older computers. Every single texture displayed (or not displayed) will cause the video card to draw it. Caulk is the exception. Caulk tells quake to NOT draw that surface. Why use caulk? Think about all the surfaces we just created with this room.
We have a total of six brushes. Each brush has six sides. That's thirty-six sides. However, how many will you ever see when inside this room? You will see six. That's thirty textures that the computer will attempt to draw, but that will never be seen. Thus, we use caulk. This makes the level more playable by reducing lag and drain on the cpu/graphics card. Ok, let's go ahead and do this.
First, we need to select all your brushes. Do this by holding shift and clicking on each brush in turn. Let's use the viewfinder to do that, just for practice purposes. Why? Because eventually your level will become so complex it's impossible to do it in the other windows. You will HAVE to use the viewfinder.
Can't reach the other brushes? Right click on the viewfinder, rotate your view, then right click again to turn that off and select the remaining brushes. Easy, eh? Regardless, we have now selected all our brushes. Congratulations.
Now bring up the texture menu by hitting 't' again. You'll see a list of various interesting textures. These are 'common' textures, which in reality means they're used in basically all maps. However, these aren't things like walls or floors. Instead, they are'special' textures. Basically, they include caulk, but also such things as textures to keep people from going somewhere, or to stop bullets from traveling through them. We'll get into all that as the tutorials continue. At any rate, select caulk, which is a pink texture.
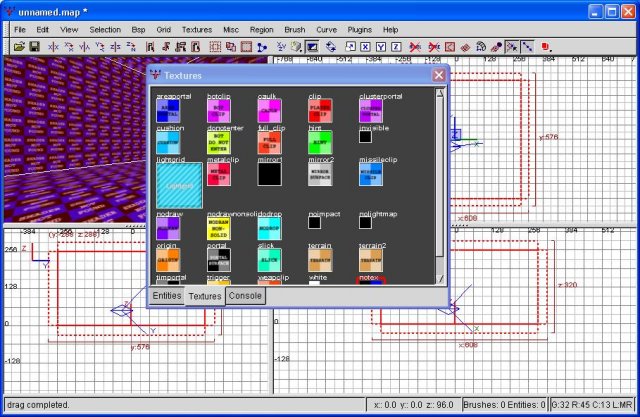
Common textures
In my screenshot, it's the third texture, between botclip and clip. Once you click on it, suddenly all your brushes will be a bright pink. This is, actually, a good thing, though a bit hard on the eyes. Regardless, once you get this done, hit escape to close out the textures window.
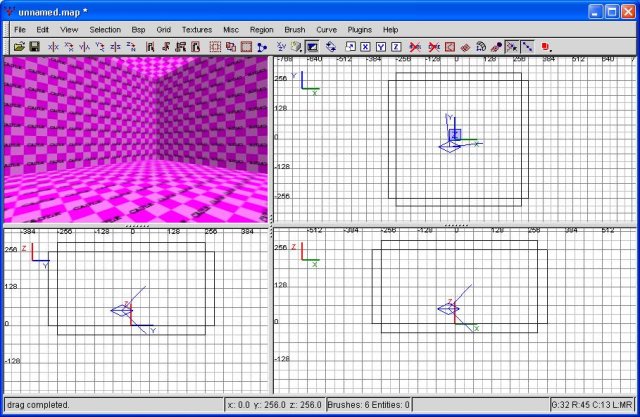
Pink rooms?
If you'll notice, by hitting escape we did not only turn off the textures menu, we also deselected everything. That fine, that's what we wanted. You may be asking yourself, "why don't we texture the inside of the cube now?" Or, perhaps, "HOW do you texture the inside?" Read on to find out.
Basically what we want to do next is highlight just one side of a brush, not the whole brush. This can be easily accomplished by hold control, shift and then left clicking. This will select a single face. You can click on any face, but only select one at a time using this method. Another option is control-shift-alt and click. This, actually, is my preferred method. This allows the selection (and deselection) of multiple faces. Let's go ahead and select just the floor for now. Either ctrl-shift click or ctrl-shift-alt click the floor. Selected too much or having issues? Just hit escape, that deselects everything.
Once you have the floor selected, let's go back to textures. This time we're selecting base, then base_floor. This will load all the base_floor textures into memory. The following should illustrate.
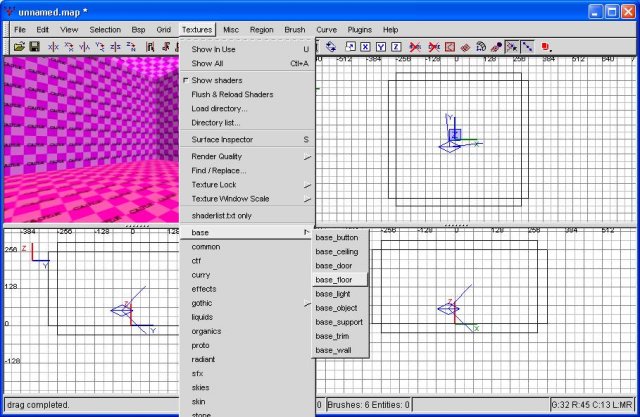
Selecting base_floor textures
Alright, once we have those loaded into memory, hit the 't' button again to bring up the texture picker. Now a whole list of wonderful textures will confront you. There are quite a few options, but we'll go ahead and just pick the first one, achtung_clang. The moment you click on it, your floor will be that texture. Allow me to demonstrate.
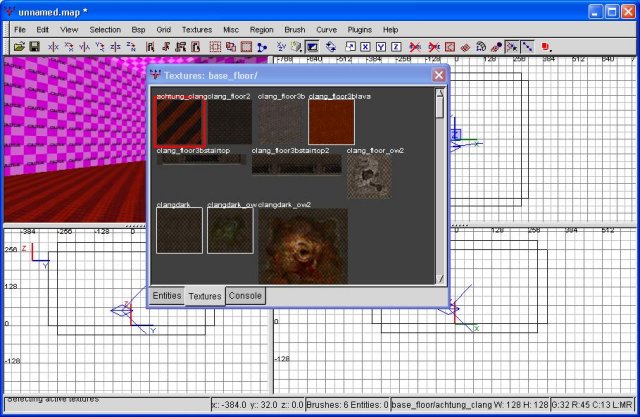
Texturing the floor
Great. Hit escape to close the texture window and deselect the face of that brush. If you didn't follow all that, please reread it. At this point I'll assume you know how to select textures.
What we're going to do next is highlight all the wall faces. Simply ctrl-shift-alt click them all in order, until all 4 are highlighted. This will require you to rotate your view-finder, so be sure to right click on that, then right click again once you've repositioned your view accordingly. From here on out I'll assume you can use this, as well.
Once all of them have been selected, let's go to textures, then base, then base_wall. This will load all the wall textures. Hit 't' to bring up the texture menu, and let's go ahead and select something interesting. I've decided to go with atech3_a. Once you have that, hit escape, and you should be seeing something similar to this.
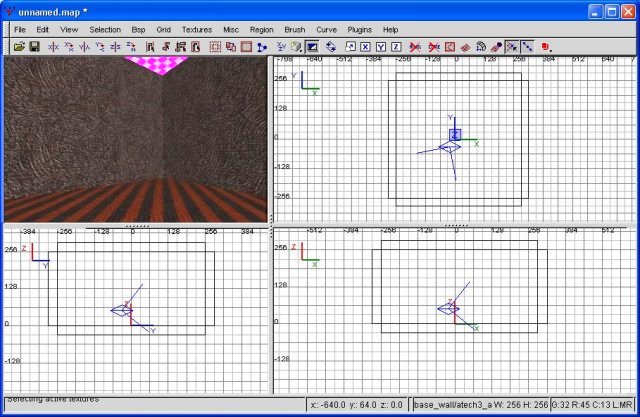
Texturing the walls
Excellent. What's left? The ceiling of course! Let's go ahead and do that. However, we're going to do something a bit different. We're going to give the ceiling a sky texture, rather than just a ceiling texture. Why a sky texture?
There are many reasons to use sky textures. For one, they're quite aesthetically pleasing. Clouds moving across the sky, and the odd "million-mile away" type effect. Additionally, skies typically emit light. Without light of some sort, our level would be completely dark. A sky is a quick and easy way of satisfying this requirement.
Let's go back to textures, and this time choose skies. As you may have guessed, this loads the sky textures into memory. Now, select the ceiling's face (ctrl-shift-alt click) and bring up the texture menu (t). We're going to choose hellsky2bright. Notice the white border around the texture. This means that the texture has a "shader" attached to it. Shaders make things happen to textures. Shininess, light, cloud movement, and a hundred other things. Also notice, if you will, that some of the textures in this list do NOT have a white border... thus, they do not have shaders. What does this mean? This means that those are ONLY a texture... they do NOT exhibit the properties of skies. Why are they here? I don't know, ask Id.
Regardless, we now have a textured sky. Congratulations.
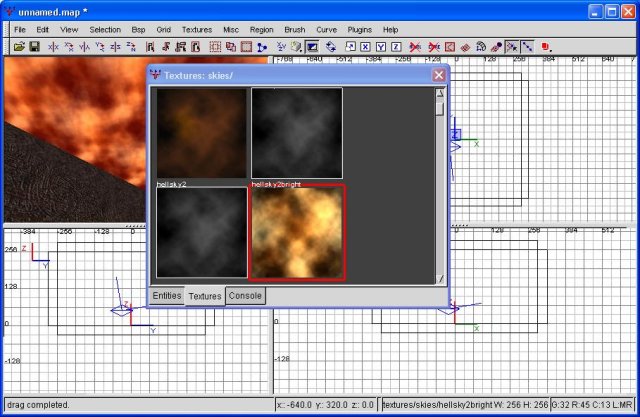
The sky is hellish this morning
Well, then we're done, right? Nope, not quite yet. We have one, final thing to do. We need to put in a spawn point, so that your players have some place to enter the world at. A map without a spawn point is like building a house without a door... it may be wonderful, but noone can possible know. :) At any rate, let's create our first entity.
Well, we all know what brushes are by now. They are the building blocks of any level. So, what are entities? Entities are special objects. Spawn points are entities. Weapons, packs and health are entities. Areas that instantly kill you? Yes, that's an entity as well. Let's make our spawn entity then, shall we?
Let's start in the top view (top right window). Right click on it and you'll be confronted by a long list of options. What we're interested in is info, then player_deathmatch. Why info? I don't know. That's the way Id made it. The reason we're putting in a deathmatch spawn is because it's easier that way. When we finish the map up, we'll make red/blue spawn points. Just trust me on this, we'll stick with the info/player_deathmatch for now. An illustration, if you will.
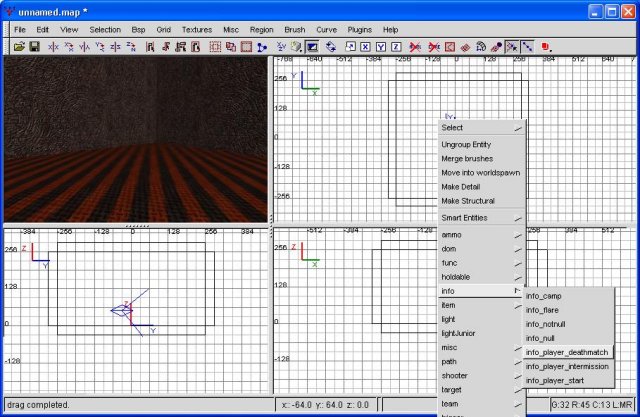
The deathmatch spawn point
Ok... now you'll notice this red box hovering in the air (probably) with an arrow pointing out of one side. Move your viewport around until you can see it. This is the spawn point, and the arrow shows what direction the player will be facing. First, let's move it into position.
The ideal position for a spawnpoint is several grid-blocks away from any walls, and a bit in the air. If you put it a block or two above the ground, this should severely cut down on the possibility of telefragging someone, which is just annoying as hell. Like a brush, you can click and drag it in any view. Unlike a brush, you don't have to click INSIDE the entity. Since the entity isn't resizable, you simply move it. I moved it as the illustration below will demonstrate, but you can put it anywhere you want, so long as it's inside your room.
NOTE! An entity must NOT be in the void. If you have ANY entity in the void, you will get a leak error on your map compile.
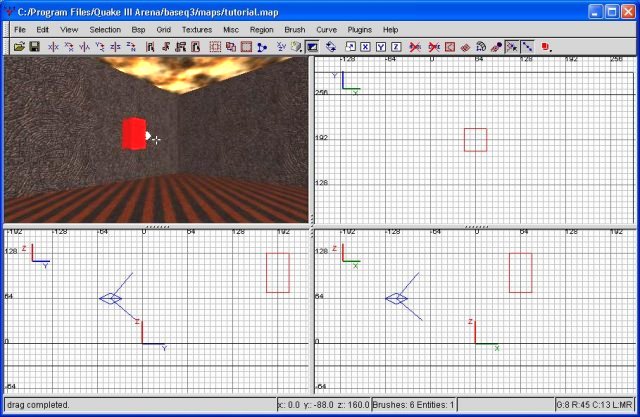
The spawn point in position
Are we done yet? Practically. Before we continue, let's save the map. In all reality, you should be doing this constantly. There's nothing worse than losing 2 hours of work because GTKRadiant (or windows) crashed. It probably won't crash much when the map is small... but when the map gets massive, your chances of experiencing a crash increase dramatically.
Ok, to save, go to file, click 'save-as' or whatever, and make a name. I'll call mine "tutorial". Creative, aren't I? Note the extension of the file is .map... that's because this is an uncompiled (or source) map file. The compiled file will end with .bsp, which lets you know it's ready to be played. Speaking of which, shall we?
To compile the map (and run it), click on BSP at the top. We're going to choose the top option, BSP, -vis, -vlight. There are numerous options which may speed up the compile process. Since our room is so small, this should take no time whatsoever, though.
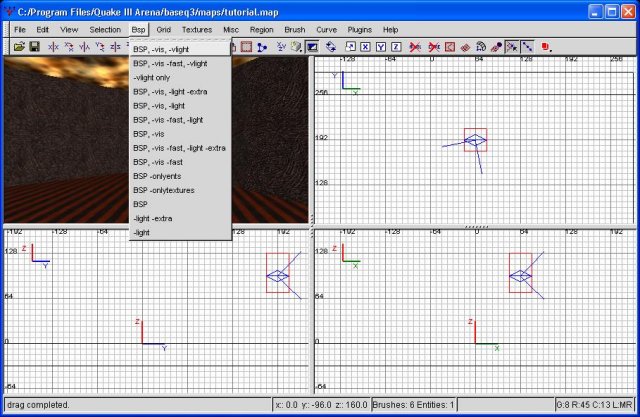
Choosing your BSP mode
Once you click on that, the program automagically begins compiling. You may see some information fly by... the bigger the map, the more time you'll have to read this. If you happened to have inadvertantly created a map leak at this point, this program will let you know. Just look for holes between your brushes, leading into the void. I'll withhold a full discussion of tracking down leaks for another tutorial, though, as this one is getting quite lengthy.
After compiling, quake3 will launch (if you have your GTKRadiant configured like mine, see the first tutorial) and you will be in your world. Congratulations. You have just built your first room, and your very first map.
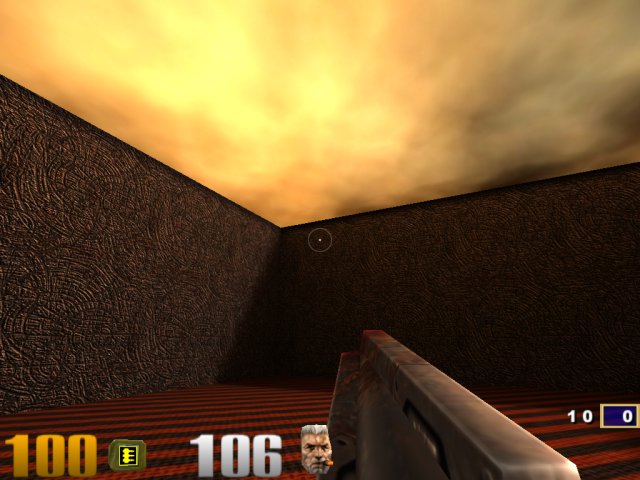
Your first room, your first map. Aren't you proud?
Would you like to see what my map file looked like after this tutorial? Download it below, throw it in your maps folder (usually c:\program files\quake iii arena\baseq3\maps) and load it up in GTKRadiant. It's not too complex (or large) yet, but it will grow as our maps grow. Please note, you may need to right-click and choose 'save as'.
The .map file


